
Schematic
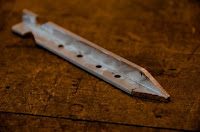
The schematic for the 5 1/2" stake is simple and straightforward. It mirrors many of the ones that can be bought in stores that are good for medium to hard ground. I also drilled four holes down each side of the stake to cut down on the weight a bit (and it looks neat). I did some durability testing (put a stake in a vice and pulled), and as one would expect, the weakest point of the stake is the notch, the thinnest part of the stake. So, adding these holes makes little structural difference (i.e. if it bends where the holes are, you have some other, more serious problems to deal with).

Materials
- 1 piece aluminum angle iron
Tools
- Drill
- Band Saw
- Sander
Remember, always wear safety goggles when working with power tools!
Instructions
Mark the segments to be cut from the aluminum angle iron stock. I simply used pencil to make a mark every 5.5 inches.


Cut the angle iron stock into the 5.5 inch individual stake pieces using a band saw. The edges don't have to be perfect as all the irregularities will be sanded away later.


In order to make sure that there is no hard edge where the cord will go, I drilled holes at the apex of the indentation. This ensures that the cord won't start chafing and break. Thus, mark the location about 5/8" from one end of the stake (this will be the top) and then drill a whole about 1/4" from the side (the side without the angle). Do this on both sides. I used the #18 bit in the drill, but feel free to use a larger or smaller one if you want larger or smaller holes.


Next we're going to cut the top of the stake to make the notch where the cord will go. Mark a point about 1/2" to 3/4" from the whole that was just drilled. Using the band saw cut out the triangle. Again, this doesn't have to be perfect as it will be sanded down later.


Since we're already working with the band saw, cut the bottom of the stake to make a pointed end. In my case the start of the point is 3/4" from the end (i.e. the sharp part of the stake is 3/4" long).


Since we're already working with the band saw, cut the bottom of the stake to make a pointed end. In my case the start of the point is 3/4" from the end (i.e. the sharp part of the stake is 3/4" long).

Optional. Because I was using relative heavy aluminum stock, I decided to drill 4 holes in each side of my stake. The first hole was 3/4" from the bottom of the cord notch and then 3/4" apart. I used the same #18 drill bit as before.


Optional. If the holes are unclean (i.e. there are bits of metal still attached to the bottom of the hole), simply take it over to the sander and sand down the metal.


Now that all of the cutting is done, go to the sander and start smoothing and rounding the rough edges. I tried to go over every corner to make sure that there is nothing sharp that could either tear the bag that they would be carried in or chafe the tent cord.
Voila! You should have yourself a stake! (Or, in my case, 8 new stakes.)
Voila! You should have yourself a stake! (Or, in my case, 8 new stakes.)
No comments:
Post a Comment